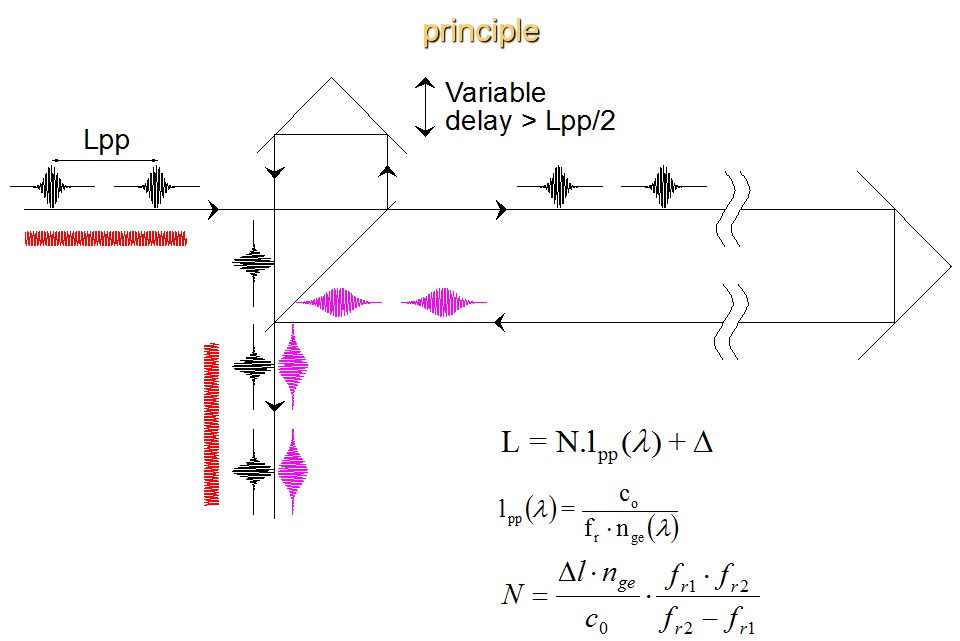
Figure 1: Scheme of the measurement principle.
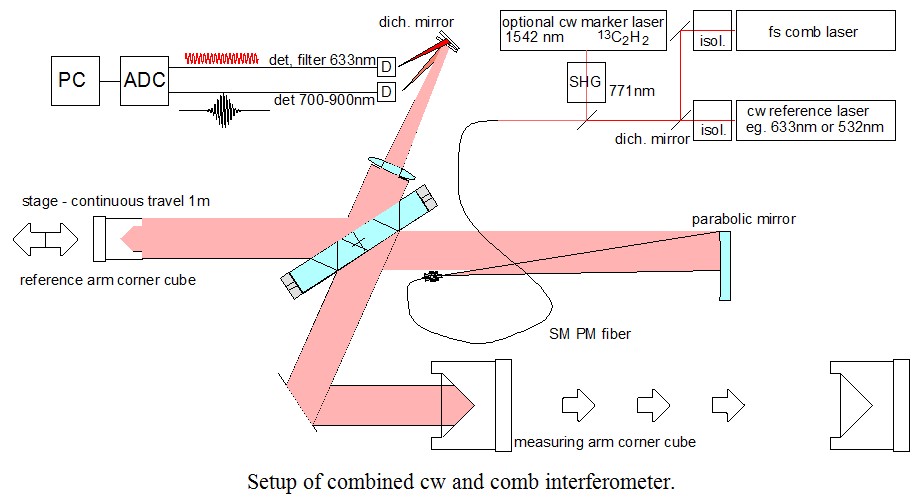
Figure 2: Scheme of the setup of the combined cw and comb interferometer.
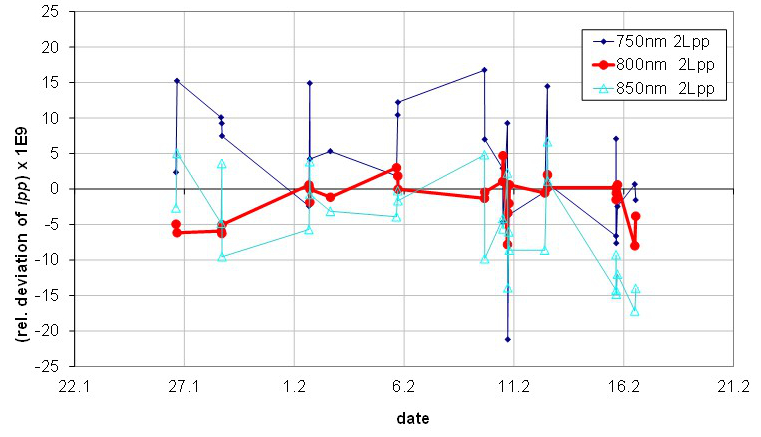 Figure 3: Results of the comparison between the cw counting interferometer and the comb interferometer with stationary phase evaluation for three different wavelengths. Effectively it means direct measurement of group refractive indices at these wavelengths by the laser interferometer. The deviation of the experimentally measured group refractive index (or of Lpp(λ)) from that calculated by the Ciddor formula is shown. The scan starts at balanced arm lengths (0 m distance) and ends when one arm is by more than 1.5 m longer.

Figure 4: Arrangement for the non-contact measurement of a gauge block’s length. Everything else is the same as in the absolute distance measurement, except for a set of three apertures at the interferometer output which transmit signals from the central part of the corner cube, and both faces of the gauge block. The two rectangles within the circle represent reflections from the front and rear face of the gauge, with the interference fringes shown in grey.
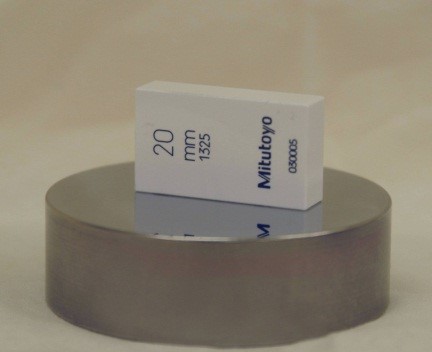
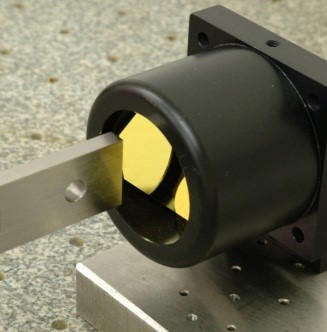
Figure 5: Up: Example of a gauge block wrung on the platen for standard measurement according to ISO 3650. Down: Non-contact measurement of a long gauge block in double ended interferometer.
Distance and length measurement with fs comb radiation
Czech Metrology Institute (CMI), Prague
Menlo Systems, Martinsried
Authors: Petr Balling (CMI), Benjamin Sprenger (Menlo Systems)
Contact email address: b.sprenger@menlosystems.com
We have demonstrated an absolute interferometric measurement of distance using a femtosecond frequency comb and compared it with a counting interferometer displacement measurement. The relative agreement for distance measurement in known laboratory conditions is better than 10-8. A numerical model of pulse propagation in air has been developed. According to the model, similar precision seems feasible even for long distance measurement in air if conditions are sufficiently known. It is demonstrated that the relative width of the interferogram envelope even decreases with measured length, and fringe contrast higher than 90% could be obtained for kilometer distance in air, if an optimal spectral width for that length and wavelength is used [1]. The possibility of delivery of comb radiation to the interferometer via an optical fiber was shown by model and experiment, which is important from a practical point of view.
We have investigated two ways of the fringe packet position evaluation [1]:
a) simple envelope or center of gravity evaluation
b) Fourier transform interferometry - evaluation of stationary phase position for certain wavelength or a set of wavelengths
Method a) is easy, fast, and useful for long distance measurements where fringes are deformed by air turbulences/wave front errors. We have devised a way to minimize the envelope length by using an optimal spectral band. However, this method can potentially miscalculate the distance by hundred(s) of nm if the dispersion of the reference fringe packet is not exactly known (e.g. due to the beam splitter substrate). Method b) is less fast and more complex, but solves the problem of dispersion (fringe packet stretching) and enables a few-nm precision in an absolute distance measurement [2].
The interferometer uses the combined radiation of a stabilized cw laser and the fs comb. The cw laser is used as a reference for the precise measurement of the movement of a corner cube (for linearization of the interval between recorded samples), and for the measurement of the intervals between consecutive fs comb fringe packets. The Fast Fourier Transform (FFT) is applied to the linearized interferogram in order to obtain amplitude and phase spectra. The phase spectrum can be used for the estimation of the stationary phase position of fringe packet, which leads to an uncertainty of about 10 nm (k=2) for a single scan.
We have verified the method and evaluation software by measurement of the distance between consecutive pulses. The distance measured by the cw interferometer agrees with that expected for a given repetition rate of the fs comb and for the actual group refractive index of air for the wavelength used in the stationary phase evaluation. The uncertainty for a single scan is about 10 nm (per 1.5 m, i.e better than 1 x 10⁻⁸ in relative, k=2) and improves further for averages of several scans. Not only the distance between “main pulses” can be measured, but also the distance of a weak reflected pulse or e.g. the satellite pulse delayed by polarization dispersion in the SM PM fiber can be measured with sub-micron / sub-femtosecond precision, even for very weak signals.
The described method of Fourier transform interferometry was used in a new – simple and robust – arrangement for noncontact measurement of a gauge block length. The gauge block is placed slightly off-axis into the measuring arm with the hollow corner cube mirror, and is aligned such that the faces are perpendicular to the measuring beam (the rear face of the gauge block is illuminated by the beam reflected from the corner cube). The results are in a good agreement with the standard method. After appropriate correction for phase change upon reflection on the gauge block face the deviations are below 20 nm for lengths up to 100 mm, and below 100 nm for gauges up to 500 mm [2].
A similar precision is reached for the measurement of low reflecting ceramic gauges or clear glass samples. The method can be used for the distance measurement of any surface set perpendicular to the beam from any other one, or from the corner cube vertex.
Publications:
[1] P. Balling, P. Kren, P. Masika, and S.A. van den Berg: Femtosecond frequency comb based distance measurement in air; Opt. Express 17, 9300-9313 (2009)
[2] P. Balling, P. Masika, P. Kren, and M. Dolezal: Length and refractive index measurement by Fourier transform interferometry and frequency comb spectroscopy; Meas. Sci. Technol. 23, 094001 (2012)
P. Balling, P. Kren: Absolute frequency measurement of wavelength standards 532 nm, 543 nm, 633 nm, and 1540 nm; Eur. Phys. J. D 48, 3-10 (2008)
Weblinks:
Institute website:
www.cmi.cz
BIPM Mise en Pratique recommended values of standard frequencies:
http://www.bipm.org/en/publications/mises-en-pratique/standard-frequencies.html
BIPM Calibration and Measurement Capabilities:
CIPM MRA